So, where do I go from the first article? Well, you know who I am, what I get up to and what I now collect also.
So this is the first one of the restoration series of the 1920 Lister Q type. So, where did the story start on this engine you may ask? 17th of August 2017 it was for me…. or just before. Well a good friend of mine knew I was mad keen on Listers and not long after buying my P type he knew that I was thinking of expanding my collection to possibly get the full set. He sent me a contact of a chap who had spoken about selling a Q type that was a complete pile of pieces and wanting a full restoration. He only had 3 photos of it and it was literally a full pallet of bits and pieces! After speaking with the fella, I managed to grab a few more dark photos of the engine to be able to see what was/wasn’t there. By this time, I had enough experience working on Listers and studying them that I could tell from a few photos that it only appeared to be missing its fuel and cooling tanks, along with a valve spring, everything else seemed to be there! After another phone call a sale was agreed and the seller also was good enough to pallet it all up properly and was willing to send it over.
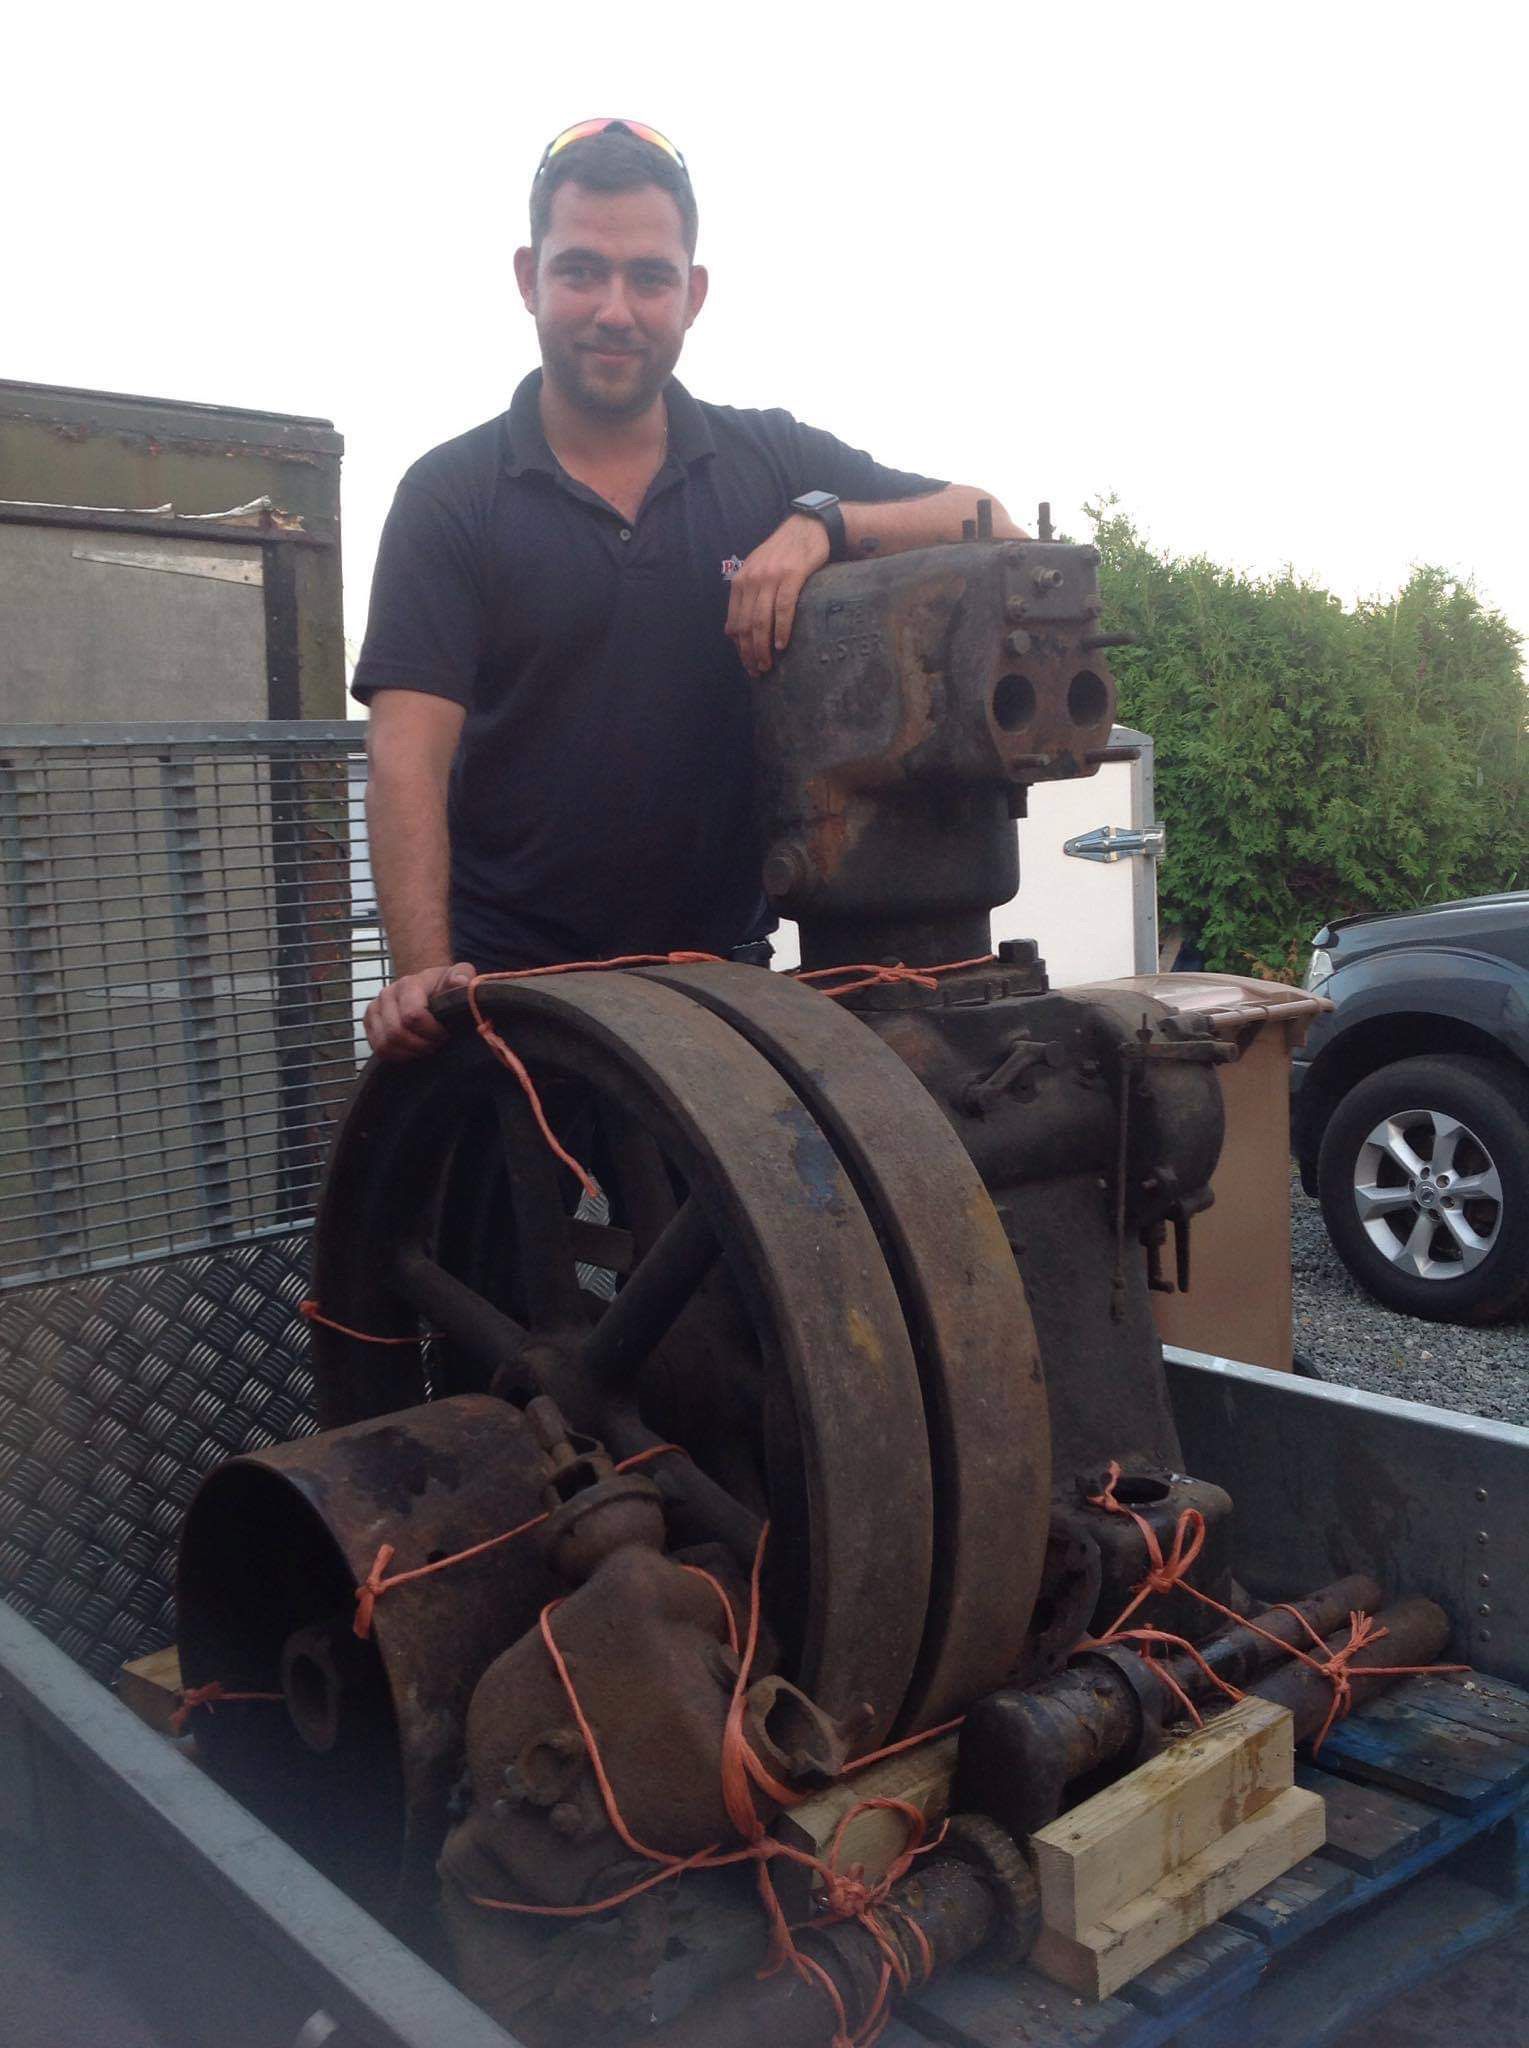
When the engine arrived on the 17th of August it was literally, and I mean literally, a pallet full of just pieces! A massive ¾ of a tonne jigsaw! I remember thinking “where the hell am I going to start with this?!” So as you do, I took it off the trailer and stuffed it away under a “shelf” and more or less forgot about it….
As the engine arrived, just a pallet of parts.
I did post a photo of the engine once I received it on Facebook and a chap did contact me saying he knew of the engine. He went on to tell me it was owned by a Mr Simms and was recently sold following his passing. He told me that the engine for some unknown reason was stripped in 1970 and kept under a sheet outside till it was moved again in early 2017. The only thing I can think of is that it was stripped for the extensive frost damage on the cylinder head that it had…. Who knows!
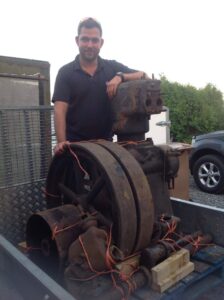
The first time that it made a public appearance was at Newby Hall in June 2019 when I moved my collection from my parents’ house to its current location. I chucked the cylinder head on and stuck it and the block on a temporary trolley to move it to the show. It was here that I first really realized how much interest that the Q type was bringing especially in its unrestored and bare state, lots of people were asking about it.
The Lister N and Q type at Newby Hall.
It wasn’t for a further 5 more years that I finally got around to giving it the time it deserved. In this time, it had its 100th birthday, 4 more engines had jumped the queue and been restored and I had nearly doubled the engine collection numbers!
So, why the long wait? Well, there was a few things. So when I bought it I knew it was almost complete but not totally and I had decided that a couple of years previous that I wasn’t going to restore any engines unless I had everything sat there just ready to go, so that I could crack on and get them done, instead of half starting one, stuffing it away and waiting for parts to land as and when I found them. So in this time I actually bought a rather rough, but complete P type that had had a cylinder head change and was seized solid but was complete with a mint style 2 vaporiser and a fuel tank! Mine was missing a fuel tank and the vaporiser on mine needed a fair bit of repair. I did get this repaired but wasn’t overly happy with it, but when the P type popped up at the right money, I knew I had change to get a rare Lister back up and going! So I swapped the vaporisers over (yes they are the same part numbers) and flogged the P with the rough vaporiser off the Q type making my life a damn site easier and offering up a P type to someone else at a good price! I also wanted to get a trolley made for it, as with having experience with these big engines before, I know once you start building them up, lifting them safely and easily onto a trolley isn’t easy! So I wanted to have its trolley built and ready to rock and roll first so that I could then put it onto that piece by piece, again, making life easier!
February 2024. I had gotten the P type done in the January as that was just trolley and a cooling system restoration and was finally ready for another “big restoration”. So I had learned a lot from when I did the P type trolley and wanted to make a few modifications to the Q type one when I did that. It added a lot of extra work but to be honest, it’s a lot better for it. So what I did was weld plates onto the end of the cross support and bolted it in place, rather than just welding it in place like the P one and also because I have used the smaller Lister trolley, the steering part needs some spacers adding in to allow for the extra width of a N/P/Q/R these where added but I boxed them in this time as the P type trolley I never did and it just didn’t quite look as finished, so this job was done and I must admit, the extra work was definitely worth it! The trolley looks finished and the engine sits so much better on it with it been ever so slightly wider. Something to look out for if you happen to see both engines out at a rally together.
I wasn’t exactly sure how easy, difficult or awkward the restoration was going to be. The engine was fully stripped, nearly complete but completely filthy. So the first job of this was a total de grease and clean of the crank case and basically start from there and work up! I set to firstly with a steel scraper and scraped a good ½ inch of sticky, black, smelly sludge out of the crank case bottom before attacking it with brake cleaner and Jizer to get it clean. *note* some brake cleaner is quite aggressive and does soften old lead based paint! And very quickly! But some doesn’t bother it at all. It is worth testing this on a small area that isn’t going to be seen before going hell for leather with it all over an engine and knackering the paint! You have been warned!! What I usually do is get 95% of the muck off with Jizer (very safe and water based) and then finish off with brake cleaner as I find that gives the best results for a proper clean.
I took the opportunity to do this while it was totally empty, scraping out the bottom of the crank case where many years of oil, sludge, leaves, pine needles, acorns and sticks had gathered while it had been sat outside for all them years.
I was amazed at how well this cleaned up. I could tell it was going to be nice but even I was surprised how well it come up! A good scrub with a small brass tooth brush sized brush was the weapon of choice and plenty of patience! Scrubbing with that and a mix of Jizer and brake cleaner and then steam cleaned off afterwards was the way to go about it, as the brass brush was aggressive enough to remove all the grime but soft enough to not damage the soft lead paint that was hiding underneath it all.
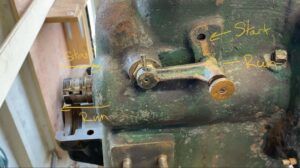
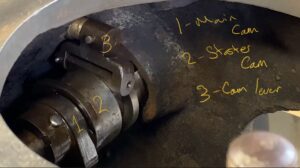
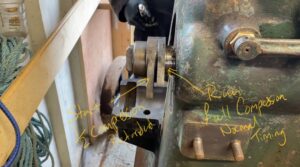
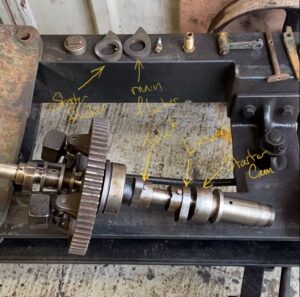
I got the engine crank case put onto the trolley to start building up. I hadn’t at this point committed to drilling the holes in the fresh steel work to where it wanted to be as I wasn’t sure myself where or how it would sit so for now it was just dropped on. The first big job was to actually remove the camshaft. The engine was stripped but the camshaft had been put back in loose and was seized back in place, along with been seized itself. Now you might wonder how a camshaft can seize. So on these the governor weights are mounted internally on a sliding collar that is linked to the throttle linkage, this and the weight was seized but also the advance and retard mechanism is on the end of the camshaft. How this works is that the camshaft is effectively in 2 pieces. The cam has 3 lobes. 1 for the inlet and 2 for the exhaust. What happens when the engine is put into “start” (upwards) on the lever on the outside the cam moves inwards. This does 2 things. The thing you see on the outside is that the 2nd magneto flicker is brought into play and this retards the timing for easier starting. The second thing it does is bring a small 2nd exhaust valve lobe into play under the exhaust valve lifter, giving it a little lift part the way around it cycle letting some of the compression out for an easier start. As a 3.9L single cylinder engine takes some pulling over on full compression! So all this mechanism was just totally solid to the camshaft though years of been sat outside and with old oil caked around everything!! This was a fair old job as I have never had a full cam shaft stripped on one of these so it was a learning curve of how it all went. I quite enjoyed it as I do like a challenge but at the same time, quite stressful as I know how easily the cam gears can break so I was careful not to cause any damage to this!
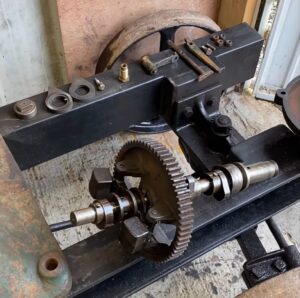
Camshaft ready to re-fit.
The camshaft came apart relatively easily with very little fight. I did have to gently warm parts though to just loosen up any old oil to help it come to pieces. The most awkward thing was really the length of it as these things are nearly pushing towards 3 feet long and getting it gripped in the vice without damaging or marking any of it was a bit of a headache! Luckily it came to bits and only required a good clean and a light polish with some fine emery cloth to remove any small marks from it before been put back together as a lump and ready to be dropped into the now cleaned crank case.
Below – Explanation photos of how the camshaft works and all the relevant parts that go along with it. It is quite a complicated design but a very simple idea once you get your head around it.
From here the next job was the crank shaft. This was a fair undertaking in itself, but come back next time to read all about that!
You must be logged in to like this post.
Country: GB